You Say Fall Sports, I Say Wardrobing Opportunity
This Fall, Caleb will be playing sports again (sorry to be so mysterious, but I'm not going to share more than that with the Internet). As I've learned from previous Fall Sporting Things we have done, sitting in a lawn chair in the evening for an hour while he practices on a field with no trees to stop the wind (I understand why fields don't have trees, but it just makes it colder) gets pretty cold starting around mid to late September and by October I'm frozen solid. This time, I'm going to be prepared. As soon as we got him signed up, I started thinking about staying warm. The first thing I did was wander around Ravelry to see what I could find in hand coverings. (If you've been reading this blog for very long, you realize that keeping up with cardigan production is not a problem around here.) I found several options using sock yarn which, as any sock knitter can attest to, tends to multiply like rabbits on a carrot farm, and it wears well.
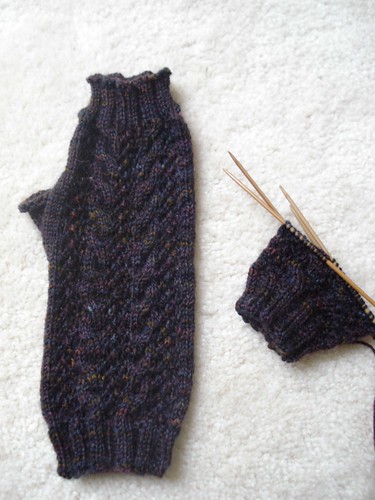
For my first item of Clothing to Keep Me From Becoming A Mom-Cicle, I am working on a pair of Merletto Mitts (free pattern!) I'm using a skein of Mountain Colors BearFoot in the Moose Creek colorway. This is a fairly easy fingerless mitt pattern, which is useful worn alone or pulled over a pair of gloves as a second layer when it's really cold. I've worked this pattern almost completely as it's written and as you can see, it has a good long section below the hand to protect the wrist from freezing wind in the gap you can get between your sleeve and the mitt if you don't knit your mitts long enough. I've finished the first mitt except the thumb (whose stitches are held on a piece of waste yarn) which I'll do when I finish the second mitt. I like to work both mitts, then both thumbs.
I did make two changes and I'm glad I did. The first thing I did was to change needle size - the pattern calls for US 2's but that sounded big to me and since my hands are smaller than average (most 7 inch bracelets don't have to be undone for me to get them off) I decided to go with US 1.5's for needles. This still gives me a mitt that's got room for a glove underneath but it's not too floppy for me to wear either. The other change I made was to the thumb location. The vast majority of fingerless mitts place the thumb at the halfway point between the palm and the back of the hand. This works fine when you work the mitts in stockinette or all over ribbing. But I've learned the hard way that when you add a pattern to the back of the hand however, it will be pulled towards your thumb as you wear it, leaving a blank space on the outside edge of your hand. This is because the thumb doesn't grow out of the exact side of your hand - it's farther around on your palm. Unless you walk around with jazz hands all day, you're going to end up with wonky mitts. I've discovered through some experimenting that if I use 40% of the stitches for the palm, then work the thumb and allow 60% of the stitches for the back of the hand, I can keep the fancy patterning on the back of the mitt without walking around with jazz hands all day (it's very hard to drive that way). So, when I began the thumb gusset on these mitts, I worked the back of the hand pattern, worked 5 stitches in stockinette for the side of the hand and then began my thumb gusset and then worked the remaining palm stitches. This keeps the thumb where the thumb really is and the back of the hand stays nicely patterned. (When you do this, like any pair of patterned mitts, you have to make the second one with the thumb on the other side of the palm.)
Labels: Small Projects
posted by Melanie at 8:17 AM
![]()


7 Comments:
Those are beautiful! I made these last month as part of the Fingerless Glove Fanatics (http://www.ravelry.com/groups/fingerless-glove-fanatics) Knit-a-long on ravelry and just love them. I did mine in Malabrigo silky merino.
That sounds like a lovely idea, too bad I don't need some here in Ca. I have the same problem with bracelets.
Thanks for the tip on thumb placement. I have that same problem and will try your fix.
Thanks for the tip and the link to these mitts. I love mitts and haven't seen these.
I love your mitts! They look great! I'm so glad you liked the pattern!
What a great idea! I am really in the mood for fall and fall knits.
Oooh, thanks for the tip on the thumb and the pointer to the pattern. I too have the same problem with bracelets except they usually fall off not just come off when I want them to.
Post a Comment
<< Home